
Low Code and AWS Serverless - seems contradictory? Not at all. Take a look at how I integrated AWS Serverless components with a bubble.io Low Code application to create a fascinating Software-as-a-Service product. We will see what tools I used, how they form an architectural blueprint. Last but not least, I will show you why you definitely should give it a try.
In case you like watching better than reading, you can get the content of this article as a video here.
The architecture of Product P relies on three main components. Besides that, the frontend and the orchestration of the user experience are built with the Low Code tool bubble.io. The backend services rely mainly on AWS as a Cloud Service Provider. Furthermore, I added very little custom code using python and the MediaInfo library for python.
Amazon Web Services is used to cover the heavy workloads of Product P like the audio transcription itself. Despite that, it provides services for storage and other infrastructure components. Let's have a look at those.
With S3, I used one of the most common services of AWS. It's a service that lets you store and receive large files on the internet. It's mostly used to store images and other files for web applications. Furthermore, it comes with built-in features like retention policies, access policies for the files, and encryption (just to mention some). The container that stores files is called a S3 bucket.
The API Gateway can be used to create REST APIs that let you interact with other services and infrastructure components on AWS. It is basically the entry point into the AWS infrastructure. Some of the great features are built-in scalability and the option to secure your APIs with API keys.
When it comes to serverless architectures, lambda functions are the main building blocks of those architectures. Lambda functions allow you to execute custom code without the need to operate a server. They provide you with runtimes for several programming languages like JavaScript or python.
This is one of the many services that AWS provides. A service executes a given task like data analysis, operating a database, or in this case extracting a written transcript from an audio file that contains speech.
The Serverless Application Model is a toolset for cloud developers. It allows you to define and create serverless infrastructure without a lot of effort. One can use it to create a standard deployment of a serverless application. That serverless application can be composed of an S3 bucket(s), an API Gateway, and Lambda functions.
Besides the Cloud Service Provider tools, I also used a number of Low Code and SaaS tools. I used bubble.io to create the frontend and to handle user interaction and workflow. The online payment is done through Stripe.
One of the most commonly used online payment providers is stripe. Stripe offers payments with credit cards and other payment methods. It handles taxation and invoicing for you. Furthermore, it can be integrated in any web application.
The whole user experience and interaction with Product P are based on bubble.io. The Low Code platform provides visual elements to create the user interface, workflows to handle user inputs, and a database to store data like the transcript or user profiles.
Once, bubble.io does not provide enough functionality, it can be extended. One of the extension points is a plugin. Within the plugins, you can execute custom code or create your own visual elements for the user interface.
In very few places, I needed to do traditional software development. In those cases, I relied on python as a programming language and a third-party library called MediaInfo
The MediaInfo library is a pre-built software library that helps to analyze media files (video and audio). In our case, it's used to analyze the length of the uploaded audio files.
The above-mentioned Lambda functions do execute custom code. This code is written in the programming language python.
Now, let's get to the details. In the following paragraphs, I'll explain how Low Code, Cloud Provider services, and traditional software development play together to form Product P. I consider this architecture as a blueprint for creating SaaS-products that go far beyond the limitations of Low Code, but on the same hand benefit from the advantages of Low Code.
I will explain the details along with the user experience. So, we'll go from sign-up to the written transcript and take a look at each step and the tools used for that specific step. Despite the written explanations, I'll illustrate the architecture with diagrams. Let's jump into it and do a transcription!
As mentioned above, the whole user interface of Product P is built with bubble.io. For the front end, I do rely 100% on Low Code. From a technical perspective, there is nothing too complicated to be found in the front end. The user lands on a landing page, which explains the product. When signing up, the user triggers a workflow in bubble.io, that creates a user object in the Low Code database. Additionally, the login is also done with Low Code. Here, the user logs in with an email and password. That login saves the session token in the users' browser.
Taking a look at the below diagram illustrates the Low Code building blocks that are in place in bubble.io to do the sign-up and the login. The user uses visual elements (top) to input data and triggers a workflow (middle). The user object itself is stored in the bubble.io database (bottom). Sign-up and login-related components are colored green.
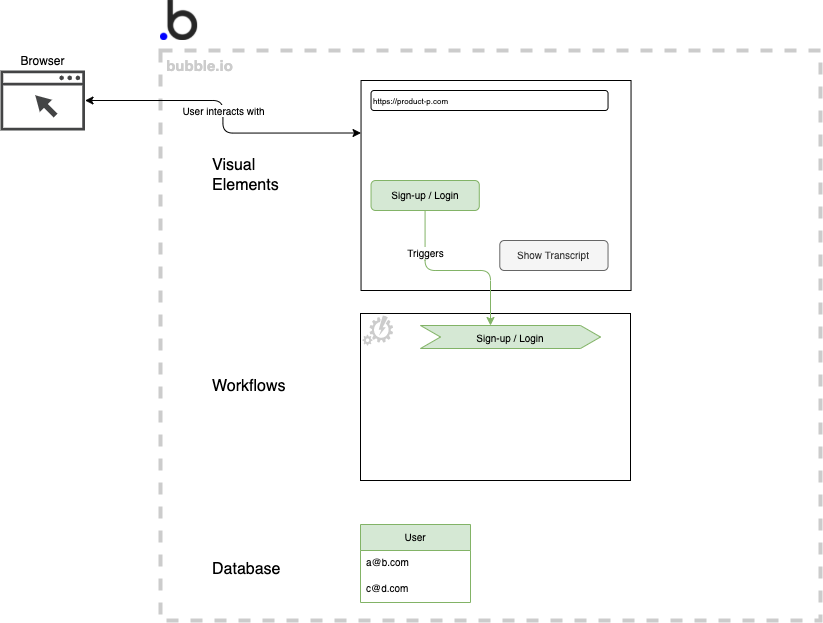
Sign-up and login with bubble.io components
In order to upload the audio file (mp3 or wav), two main actions have to happen. The bubble.io application needs to generate a pre-signed URL for the S3 bucket upload. The second step is to direct the users' browser to upload the file to that pre-signed URL.
The generation of the pre-signed URL needs to call AWS functions. Therefore, I used the AWS software development kit (AWS SDK) for python to generate that pre-signed URL. The AWS SDK itself needs to be embedded in a runtime for a programming language. That runtime is part of the lambda function that I introduced above. That's why I developed a lambda function (which is just executed in python code) that uses the AWS SDK to generate a pre-signed URL to upload to S3.
The pre-signed URL incorporates the file name and the path of the file to be uploaded. Furthermore, It only works once for the upload. That means that the user can use this URL to upload a file only with a given name to a given path - only once. This mechanism ensures, that the S3 bucket does not get flooded with malicious file uploads.
The lambda function that executes the functions on the AWS SDK has to be exposed so that the bubble.io application can use it. That is done with the help of an API Gateway. The API Gateway routes the incoming request to the requested lambda function. Besides routing the requests correctly, the API Gateway also ensures that the request contains an API key. Requests without that key cannot get through to the lambda functions. As a result, the lambda functions are protected against unauthorized usage.
Given the API Gateway, we do have a single entry point to the AWS infrastructure. That single entry point is integrated with the bubble.io API Connector plugin. Within the plugin, I formulated the HTTP requests that are sent to API. Those requests carry payloads with the user inputs, such as the name of the file or the extensions of the file to be uploaded.
Below, you can see an extended diagram that shows how the bubble.io application is integrated with the AWS API Gateway. The API Gateway routes the request to the lambda function that generates a pre-signed upload URL. The architectural components that are related to the file upload are depicted in yellow.
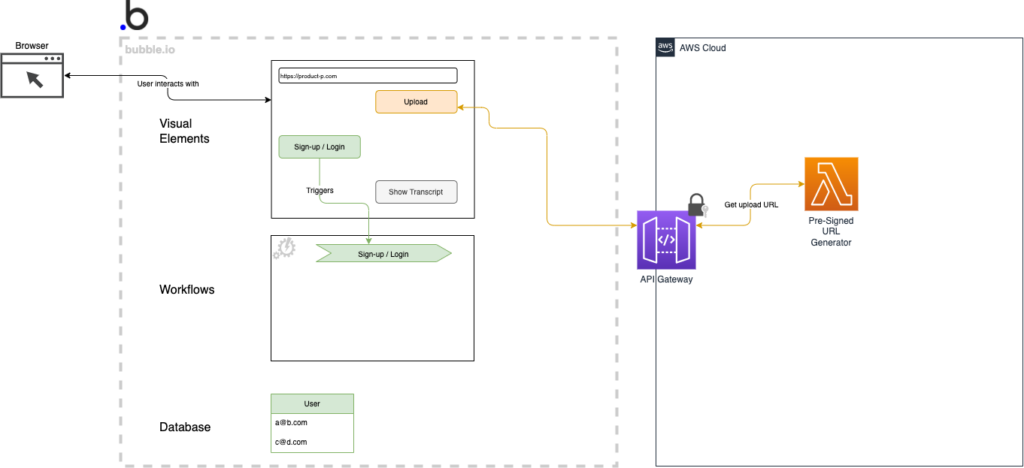
API Gateway with Lambda function integrated with bubble.io API connector
As a result of the previous step, we received a pre-signed upload URL. The next step is to actually upload the audio file to the S3 bucket. Therefore, I developed a custom bubble.io plugin. That plugin does two things - it renders an HTML file input element (which is an additional visual element in the bubble.io editor) and it starts the upload from the users' browser.
As a user, you are provided with the usual file upload dialog, which appears with a click on the "upload" button. The button and the HTML input element are rendered by the bubble.io custom plugin. The plugin receives the pre-signed URL and directs the users' browser to upload the file to the given pre-signed URL.
Afterward, the bubble.io application receives a file uploaded event and continues with a Low Code workflow. The workflow creates an entry in the bubble.io database that contains a reference URL to the file that just got uploaded to the AWS S3 bucket.
Another cool thing about this upload procedure is that we don't need to upload the file to the bubble.io application. The upload is handled by the browser, without a need to temporarily store the file in the bubble.io database. This helps us to save a significant amount of storage on the Low Code side. Hence, we are able to save the cost on high plans with enough storage included.
As mentioned above, the diagram now shows an additional data type in the bubble database, that holds the reference to the file in the AWS S3 bucket. Besides that, the custom bubble.io plugin is shown. It acts as an intermediary component between the browser and the S3 bucket.
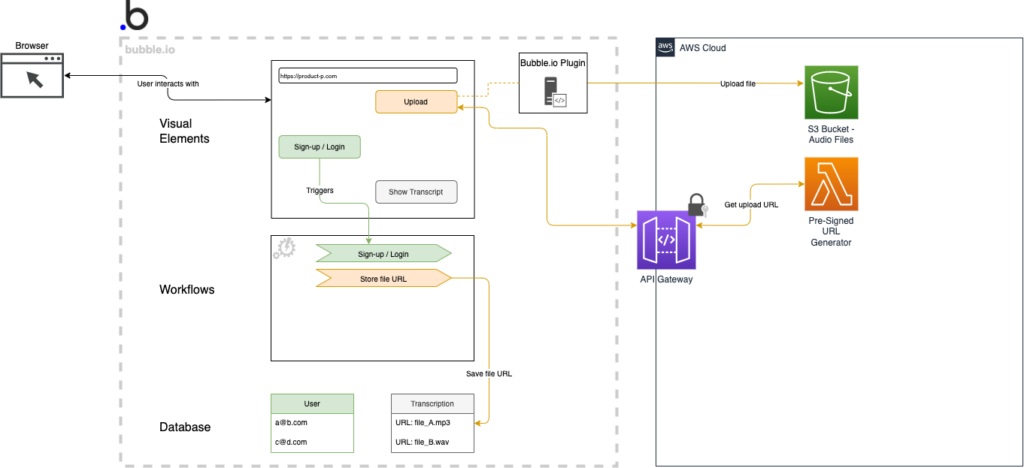
bubble.io custom plugin and upload to S3 bucket
Finally, we got our audio file uploaded to the S3 bucket. Next, as a user, I want to transcribe my audio file. In order to do so, I am kindly asked to pay first. However, before bubble.io can show a proper price to the user, it needs to know the length of the audio file. Product P calculates the price of the transcription based on the length of the audio recording.
Interestingly, this approach to pricing reflects the pricing for most of the AWS services. The price for the transcription service depends on usage. The more you use it, the more you have to pay. As a result, the pricing of Product P works the same way.
Since it is not trivial to extract the length of a recording from any given audio file (the user can upload anything), I used a third-party software that is specialized in analyzing media files - MediaInfo. MediaInfo can be used as a python library, which can be added to a lambda function runtime. Therefore, I extended the lambda function runtime for python with that MediaInfo library. As a result, I was able to pass the reference to the audio file (as it is uploaded to AWS S3) to a specific lambda function. That lambda function analyzes the file and returns the results to bubble.io.
As this is just another lambda function, it is also integrated through the API Gateway and the bubbl.io API Connector plugin. Lastly, the length of the audio is extracted by a workflow and added to the transcription object in the bubble database. Now, the bubble.io application knows how to calculate the price.
Further down you will find another version of the diagram. Within that extended diagram, the file analysis process is given the color turquoise. Additionally, you can find the Lambda function that uses the MediaInfo library.
Here it comes - the best part of running a SaaS product. We are finally ready to kick off the payment. Since we do have the length of the audio recording, we can now calculate a proper price.
Surprisingly, the payment is one of the easiest things to handle. Consequently, I only had to create a bubble.io workflow that passes the price to the Stripe plugin. Next, the Stripe plugin will pass the product data (description, file name, price, currency, and so on) to Stripe. After clicking the buy button, the users' browser will be redirected to Stripe to proceed with the payment.
Having done the payment, the user is directed back to Product P. The bubble.io workflow receives the result of the payment. Only if the payment was successful, the bubble.io application will start a workflow that instructs AWS through the API Gateway to start the transcription.
All the components that are related to payment are colored blue. You can see them in the diagram below.
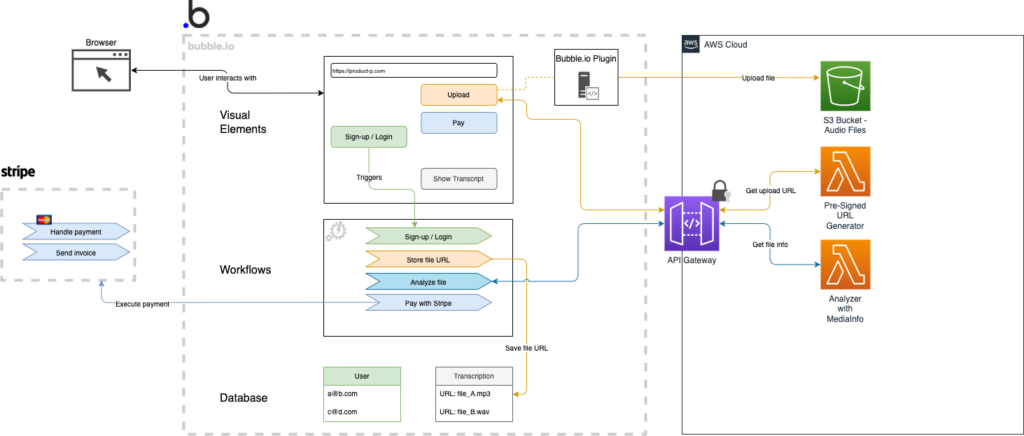
bubble.io application with Stripe payment and media file analyzer
Great! You are still with me. We are getting close to our final transcription. There is only one component we need to add for our last step to work. More precisely, we want to consume the AWS Transcribe service now. Hence, I want you to remember back to the generation of the pre-signed URL for the file upload. We will take the same approach here.
In order to call the AWS Transcribe service, we want to use the AWS SDK again. Consequently, I built another lambda function, that uses the AWS SDK. It calls the start transcription function with the help of the SDK. Therefore, it needs to know, which file to transcribe. The filename and the reference to the file within the S3 bucket are passed as input to the lambda function.
As you might have guessed, the input has to come from the bubble application. This is again done through the API Gateway. Besides the reference to the file, bubble.io also passes other important inputs. The user had to enter how many speakers are present in the audio file and in which language those speakers talk to each other. These two pieces of information help the AWS Transcribe Service to deliver an accurate transcript.
As a result, the lambda function returns a transcription job ID to the Low Code application. The Low Code application, on the other hand, will now send requests to the API Gateway periodically. Those requests are querying the transcription job status. Once, the transcription job is ready, it will return a JSON containing the transcript. Lastly, the bubble.io application will save the transcript in its database.
Here we are - the last extension of the diagram shows the invocation of the AWS Transcribe Service. The components related to the transcription are depicted violet.
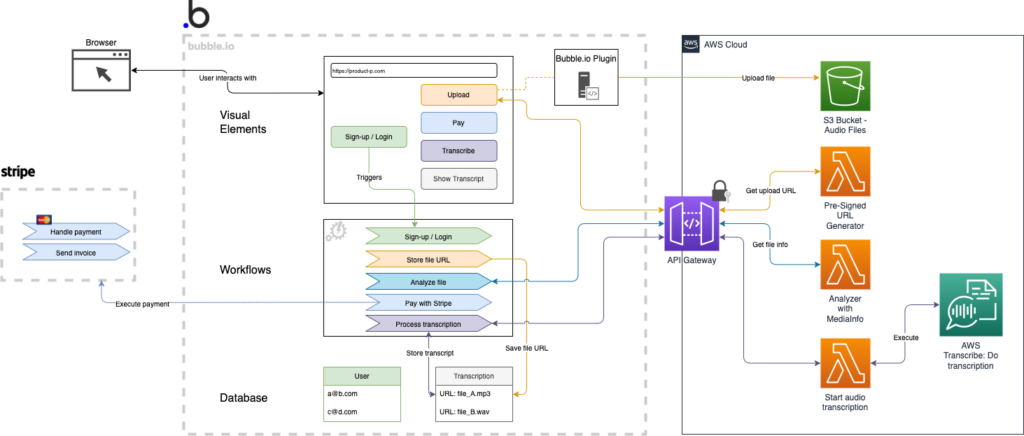
A blueprint architecture with AWS Serverless and Low Code
To conclude this article, I want to take a quick look back at the reasons for the integration of Low Code with AWS or other Cloud Service Providers. Those were the reasons I named in part 1.
First, I have explained how large files are uploaded to AWS S3 directly by using the bubble.io custom plugin for the upload URL generation and the upload itself.
Second, we could see how the Low Code application and the Cloud Service Provider are clearly separated from each other. The integration is done through the API Connector plugin in bubble.io and the API Gateway in AWS.
Third, a serverless infrastructure is inherently able to scale. Lambda function can scale many requests very well. The API Gateway has got scalability built in. As a result, all components that handle the heavy workloads (the transcription) are scalable.
Lastly, it's quite exciting to note that you can replace the AWS Transcribe Service with any AWS Service. That gives you a blueprint for integrating any Cloud Provider Service with your Low Code application.
Thank you for reading this article and happy Low Codeing!

Erzähle uns in einem kostenlosen Erstgespräch mehr über dein individuelles Projekt. Wir helfen dir bei den nächsten Schritten und teilen unser Wissen.
Nachricht schreiben